|
|
|
 Zelda 64: the
Sage's Secrets
Zelda 64: the
Sage's Secrets
~~~~~~~~~~~~~~~~~~~~~~~~~~~~~~~~~~~~~~~~~~~~~~~~~~~~~~~~~~~
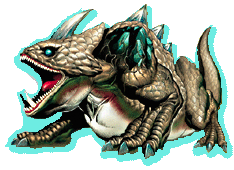
Enemy and Boss Strategy
On this page you will find our favorite and the best strategy for each and every Enemy and Boss. We have listed the Enemies in alphabetical order and by their name. If you do not know the Enemy you are searching for's name, hold Z-targeting on the Enemy and press Top-C. The Bosses are listed in order you face them. (King Dodongo) ENEMIES Anubis - A flying mummy creature that is extremely weak against fire. Use the Fire Arrow, Din's Fire, or a Bomb. They always stay on the opposite side of the room of you and each room they are in has a switch that turns on a ring of fire. You can kill them by luring them into that ring. Found in the Spirit Temple. Armos - Slash these statue-like creatures with your Sword or any other weapon to make it spin and chase you. Then hit it with a Bomb or Bombchu to blow it apart. You cannot tell the difference between real statues and Armos. Baby Dodongo - It will come out of the ground and start jumping at you. Just slash it to make it roll over. Quickly run away before you get caught in the explosion that follows. Bari - Do not mix these up with Biri, they are different enemies though they are in the same jelly-fish like family. They will drop from the ceiling of Jabu-jabu's Belly when you least expect it. Use your Boomerang on it a few times to make it split into 3 Biri. Beamos - This one-eyed monster will zap you with its blue laser once it sees you. Be careful because its head rotates 360 degrees to see all around him. Throw a Bomb at him to blow him up. If it just closes its eye throw another Bomb. Bigocto - An incredibly big form of the Ocktorok. There is only one in the game that is inside Lord Jabu-jabu's Belly. Use Z-targeting on it and be careful going around the spiked platform. Run in the opposite direction of it while holding the Boomerang out. When you meet up with it throw your Boomerang to paralyze it. When it starts to spin around quickly throw the Boomerang again until its rear end is facing you. Slash the glowing part to make it start going again. Just repeat the process until after a few more hits he will perish. Big Poe - While riding Epona take out your Fairy Bow in Hyrule. When you see one pop up shoot it with a couple of Arrows. Please see Weapons and Items the Fourth Bottle. Big Skulltula - It will fall from the ceiling on a thread of its web. When it turns around slash its belly with your Sword. The Deku Stick takes only one hit. The Fairy Bow and Hook/Longshot don't have to wait for it to turn around. Biri - A smaller form of the Bari, just use your Boomerang on it once for it to vaporize. Do not get it mixed up with Bari. Blue Bubble - A skull with a Blue flame around it. Use your sheild to put the flame out then slash it twice while it jumps frantically around on the floor. Blue Tektite - An enemy that looks like a 4-legged tick. Just use your Sword a couple of times to squish it. It can walk on water so don't take the water as a defence. Business Scrub - A plant thing that pops out of the ground and spits Deku Nuts at you. Bounce the Deku Nuts back at it with your Sheild so it gets hit by its own attack. Approach it and it will offer to sell you a product for unfair prices. Dark _____ - This is a shadow form of yourself. Found only once in the Water Temple. Whatever you do don't use Z-targeting or it will mimmick your attack and easily hurt you. The best way to defeat him is to use the Megaton Hammer without using Z-targeting. If you use Z-targeting he will fight back. Keep swinging your Megaton Hammer at him until he falls. Dead Hand - Found in the Kakariko Well when you get the Lens of Truth and in the Shadow Temple when you get the Hover Boots. When you enter the room you will see a bunch of hands protruding from the ground. Believe it or not but you have to let one of the Hands grab you. Then the Zombie part of it will come out of the ground to attack you. It moves very slowly giving you enough time to tap any button quickly to escape. Once you escape it will keep following you, so you can lure it into a corner away from the Hands. Slash it when it starts to attack you. It will go underground again so you have to let the Hand grab you again. Keep repeating this process until it passes off, again. Deku Baba - There are 3 kinds of this enemy: for the one that just sits upright biting the air slash it to get a Deku Stick. The second is a small one that launches its head at you and tries to take a bite. Slash it when its head sits in front of you and then slash it again. The third is a much larger form of the second. Deku Scrub - A plant thing that shoots Deku Nuts at you and hides in the ground when you get too close. Bounce the Nuts back with your Sheild to make it panick. Approach it to get it cry for mercy and give you a helpful hint. Dinolfos - An advanced, stronger form of the Lizalfos. Use Sword and Sheild techniques or paralyze it with a Deku Nut. They come in pairs. Dodongo - The two-legged lizard has a hard hide so you need to use Bombs on it. Fake Clay Pot - Every once in a while when you go for a pot it will float into the air and fly towards you. Just hold up your Sheild and the item will crash out of the broken pot. Fire Keese - Similar to Keese but with Fire around it. Watch out as a child because they can set your Deku Sheild on fire and burn it to a crisp. Use long range weapons like the Fairy Bow and Fairy Slingshot before it can come and burn you. Flare Dancer - There is only two in the game which are in the Fire Temple. When it's "Dancing" around quickly use the Hookshot on the center black orb, or just use Z-targeting, to make the flames go away. When he runs around keep slashing it with your Sword. He is a little faster than you so go around to the other side when he gets away from you. It will go back into the center flame pillar to reenergize. Just keep repeating the process. When he is defeated he blows up so stand back. Floor Master - A hand-shaped enemy that is invisible sometimes. When it sees you it will turn green and fly towards you. Just hold up your sheild. When it lands is the perfect time for you to strike. Slash it twice to make it split into 3 tiny forms of it. If a small one manages to grab you and take some health it will grow into a larger one. Freezzard - An ice based monster that blows frost breath. Right when it finishes a breath go up and slice it like crazy. Gerudo Warrior - Were only referring to the Gerudos that you fight to rescue the Carpenters. The other kind just arrest you and there is nothing to do but hide. Anyway, the kind you fight do a lot of tricky stuff. It is best to use the Fairy Bow. Use Z-targeting and get in close to her and don't stop firing Arrows! If she kind of coils up she is going to do a spinning sword jump, in other words she will fly at you with swords blazing. Just move out of the way and she won't know where you went, revealing the perfect time to strike her back. Ghoma Larva - They hatch from eggs and almost immediately turn red. They will then jump at you. Use your sheild and they will bounce back and be open to hit for a few seconds. After two slashes they will be gone. Gibdo - A mummy creature that is basically like an advanced and stronger form of the ReDead. Just approach it as fast as you can and slash all that you can. Make sure not to let it suck the health from you. Gold Skulltula - A golden spider creature that when destroyedis like the antidote to the Spider's Curse. Please see Gold Skulltula Locations. Green Bubble - Similar to the Blue Bubble. This Bubble is bigger and lets the fire around it go out by itself and relight again. When the flame goes out quickly slash it as many times as you can. When the flame goes out it does not fall to the floor like the Blue Bubble. Guay - A very annoying bird that makes an annoying crow like "Aw-aw-krawt!" that very annoyingly divebombs you. They always come in flocks of more than 7 that are spread out among the area. Kill them with the Fairy Slingshot or Fairy Bow. You can also slash it with your Sword when it comes to divebomb you. Ice Keese - Similar to Keese only surrounded by frost. When they dive at you and you get hit you become temporarily frozen. Use the Fairy Bow or Fairy Slingshot to kill it. If you try to kill it with your sword you take the high risk of getting frozen. Iron Knuckle - Very tough. We suggest you use Nayru's Love to keep from getting hurt easily because their Axe attack is very powerful. You can use your Sword, Bombs, or Bombchus. Keese - Bat creatures that dive at you. Use your Sword when they get near or use the Fairy Bow or Fairy Slingshot. Have the ability to turn into Fire Keese or Ice Keese when in the correct environment. Leever - A worm-like thing that appears in the Desert Collosus. When they pop out of the ground they make a crash course with you. You can kill them with any weapon but you just should't bother. Like-Like - A big mass of fat that sucks you up and eats sheilds and special tunics. Use the Hook/Longshot to paralyze it then slash it a couple of times. Lizalfos - Lizard people where you should use classic Sword and Sheild fighting. You can also use Deku Nuts to paralyze them. They always come in pairs and switch off of who gets to fight. Mad Scrub - Almost exactly like the Deku Scrub only they don't give helpful hints when you defeat them. Moblin - Giant pig-like warriors that guard the Secret Forest Meadow when your an adult. Hold Z while facing a wall and move slightly into the open to see if a Moblin is there. If there is one facing away from you use the Hook/Longshot on it. Don't walk in front of ones face because they will charge at you very fast and take you against the wall. Ocktorok - An octopus thing that jumps out of the water and spits rocks at you. Use your sheild to bounce the rocks back and destroy it. Parasitic Tentacle - Found in Lord Jabu-jabu's Belly. Use Z-targeting on its thin point and walk right out under it. Throw the Boomerang at it a few times until it splaters. Peahat - A giant plant that is found in Hyrule Field as a child. When you approach it it will burst out of the ground and start spinning its blades at you. Use anything on its small root on its underbelly. Hit it a few times to make it blow up. Peahat Larva - Occasionally the Peahat will release smaller forms of it that fly a lot faster. You don't need to focus on any part of it to destory it. Poe - Ghosts that turn invisible and ivinsible when you use Z-targeting on it. When it becomes visible slash it with your sword. When it is invisible it might spin its lamp at you, just use your sheild. Poe Sisters - 4 ghost sisters named Beth (blue), Joelle (orange), Amy (green), and Meg (purple) that can be found in the Forest Temple. For the first two (Beth and Joelle) you have to shoot the picture of them before they transfer to another picrure frame. Try to get a good angle and long distance to shoot the Arrow. After you shoot the painting once it will move to a second one. Shoot it again to make it go to a third one. After you shoot all 3 paintings, a Poe Sister will appear. Just fight it like a normal Poe. The third Poe (Amy) you will have to put toghether the puzzle after shooting the huge painting of it. The puzzle pieces fall at random positions so we can't give an exact walkthrough of the puzzle. If you run out of time don't worry, just continue moving the same blocks to the same place and wait for time to run out again a second time and then a third time. Eventually the blocks will form the correct puzzle. Once the puzzle is completed you will have to fight the Poe Sister like a normal Poe. For the fourth (Meg) there will be 3 fake ones and a real one. Have your Fairy Bow or Hookshot ready. They will automatically surround you. You have to shoot the real one. The way you can tell is that the real one spins around while the other ones don't. Shoot a few times to defeat all the Sisters. Red Bubble - Similar to all the other Bubbles. This one is surronded by Red fire that can burn you. It pops out of lava or in the Shadow Temple out of the bottomless pit. Slash it with your Sword if it approaches you. Your Deku Sheild as a child can burn from it. ReDead - A horrible zombie creature that paralyzes you simply by staring. Do not let it get to close to you because it will jump on you and suck your life. Tap any button to escape. Slash it with your Sword but don't get too close. You should come in from behind. Red Tektite - A rather weak enemy. Just give it one slash from your Master and Biggoron sword and two from the Kokiri Sword. If you are a child you can use Z-targeting and press A while you have your Sword ready for a one-hit attack. Be careful as it bounces around and over you. Shabom - Literally a bubble. Use your Sheild or Sword or any weapon to pop it. Watch out though because it is unpredictable. It bounces off walls and can go anywhere. Shell Blade - An oyster enemy that is only found in the Water Temple. When it turns to face you have your Hook/Longshot ready. It will open its mouth and show its muscle. Time your Hook/Longshot so it hits the muscle. If you miss it will charge at you with its spikes, use your Sheild. Skullwalltula - A spider that crawls on walls. Don't climb near it because if it sees you it will turn purple and make you fall off the wall you are climbing. Use the Boomerang or Fairy Slingshot or if you are an adult the Hook/Longshot or Fairy Slingshot. Spike - Found in the Water Temple.It will roll at you with spikes surrounding it. Use your Hook/Longshot to make it lose its spikes and turn into a rock. Use it again to defeat it. Stalchild - Don't fear these at all, they're almost harmless. They're only found as a child at night in Hyrule Field. Give 2 Sword strikes and they will be gone. After you kill 10 though a significantly large one will appear it is just as weak and powerless as the original. Be careful though not to let them catch you off guard because they pop right out of the ground. Stalfos - These are skeletons that fight similarly to the Lizalfos. They are much stronger than Lizalfos. Use Sword and Sheild fighting. Sometimes, when they appear in pairs, if one is defeated and you don't destroy the other fast enough the other one will reassemble and help out, making you have to destroy it again. Stingers - Stingray-like things that usually appear in water. You should aim at them from a distance before they can see you and attack in swarms. One alone doesn't do much damage but when they attack in swarms it is like when you annoy Cuccos (which is very fun if you haven't tried it)! Tailpasaran - A 3-toothed worm that appears in Jabu-jabu's Belly. Hit its tail with the Boomerang to defeat it. If you hit it'shead it will release a brown dust. If these get to you they will zap you but die in the process, kind of like a bee when it stings you. Torch Slug - A slow moving slug with a flame on its back. Put the flame out with a hit from any weapon and give it a couple more hits when it runs away from you. When the flame is on its back it will charge and jump on you. Wall Master - Navi will warn you about it when it is in your presence. When you enter a room that Navi warns you about, watch and listen for a dark shadow and a wind-like sound. It will drop ontop of you and take you back to the entrance of the Dungeon and take a Heart. Keep on the move to avoid it and when it lands slash it a couple of times because it gives you a lot of rupees. White Bubble - Only appears in 1 room in the whole game, that is inside the Spirit Temple. They are similar to the other Bubbles but these do not attack you. They simply spin in a guided circle around a Cobra Mirror. When they are not moving is when to strike. If you get in their path they will run into you. White Wolfos - A bigger and stronger form of the Wolfos. Use same strategy as the Wolfos (directly below). Wolfos - A wolf creature that cicles you and attacks when it approaches. Use Z-targeting and when it approaches hold up your Sheild. When his back is to you slash it. BOSSES Queen Gohma - Once the battle starts make sure to have your Slingshot and Deku Nuts out. When Gohma starts to charge you use a Deku Nut quickly so she gets paralyzed. Then slash the Queens eye. When Gohma goes to the ceiling, use Z-targeting on it when her eye turns red. Use the Slingshot to make it fall to the ground paralyzed. Slash her eye and keep tapping B as fast as you can. It is possible to kill her on the first drop, but if not just wait until the second drop. If you can't make Gohma drop she will lay eggs that quickly hatch into Gohma Larva. King Dodongo - Make sure to have Bombs out. Once King Dodongo opens his mouth immediately throw a Bomb into it. After a pause and explosion he should fall to the ground. Slash him once and get as close to the lava as possible so when he rolls by he won't hurt you. He will turn the first corner and stop to turn around on the second. Once again he will open his mouth for you to repeat the process. Once you have slashed him 4 times he will roll into the lava. If you can't get a Bomb into his mouth King Dodongo will throw a flame around the path. Barinade - Have the Boomerang ready. When Barinade starts firing electric shocks at you, use Z-targeting on the 3 veins connecting it to the ceiling and destory them with the Boomerang. You have to keep on the move though or you will be electricuted. Once the 3 veins are destroyed it will start moving around with the Bari swinging around it. Use Z-targeting and move along with it. Keep throwing the Boomerang until it finally gets past the Bari and stops spinning. Once it has stopped spinning kill as many floating Bari as you can with the Boomerang. It will start spinning again so keep throwing the Boomerang. Once all the Bari are killed, it will spin away from you but keep shooting electricity at you. Keep using Z-targeting and follow along with it while throwing the Boomerang. Once you hit it with the Boomerang it will fall to the ground. Slash it as many times as you can. Once it gets back up just do the same. If you get low in health there are Clay Pots with Hearts inside of them that outline the perimiter of the room. Phantom Ganon - Have your Fairy Bow ready. When you enter the Boss room nothing will happen but when you turn around to leave the gate will close. When Phantom Ganon goes into the painting you should go to the center of the room and look through first person with your Bow out and an Arrow ready. Start spinning in a circle and pay attention to the paintings. When you see Phantom Ganon charging at you from inside the painting stop spinning and get ready to shoot him. As soon as you can, use Z-targeting to get a perfect shot when he's left the painting. You don't have to use Z-targeting but for some people it is a lot easier. If Phantom Ganon does not leave the painting and instead turns around, prepare to get hurt because you found the Decoy. The REAL Phantom Ganon left a different painting. If you think you are fast enough you can turn quickly to shoot the real one. Either that you can go back to third person view and run out of the way. The way you can tell which is real and which is fake is you listen closely. The one that you can hear galloping is the real one. Once the Phantom falls off his Steed (horse) he will fire lightning balls at you. Hit them back at him with the Master Sword. Once you repelled 4 shots in a row he will miss the reversed attack and fall to the ground. Quickly go over and slash him as many times as you can. Repeat this process a few more times and he will be defeated. Once he is off his Steed he will not get back on. Volvagia - Have the Megaton Hammer ready. Walk onto the large center platform to go into a cinema scene. Volvagia will first fly around in the air aiming towards you and blowing fire. Of course avoid it. When it goes back into one of the many holes in the ground, it will come back out to look through the hole where embers come out. Run up to it and hit its head with the Megaton Hammer and then slash the paralyzed dragon. When it comes back out of its hole it will fly to the top of the room and make boulders fall from above. Keep on the move to avoid them. When he pops out of his hole again do the same Hammer-Sword thing. A few other holes may burst embers to throw you off. After you slash him he will fly around you again. Slash it again and he will do the boulder thing. After a few more slashes he will fall victim to you. Morpha - If you know what your doing Morpha is the easiest boss as an adult. Make sure to have your Longshot ready. Go to one of the platforms in the middle of the water. Once Morpha reveals itself go into one of the corners out of Morpha's reach. When the water arm reaches for you and the Nucleus goes back and forth, use Z-targeting on it and grab it with the Longshot. Slash it as fast as you can before it gets away. The Nucleus won't make another arm until you get close to it. Quickly get near it and when it starts to make the arm back off again. Watch out for the other arm that doesn't hold the Nucleus because it to tries to grab you too. Keep repeating this until it finally evaporates. If one of the arms does grab you it will squeeze you and throw you into the surrounding spikes. Bongo Bongo - You only need two things to beat this spirit: the Fairy Bow and the Lens of Truth. Always be using the Lens of Truth so you can actually see your invisible foe. This battle is made hard because of the beating on the Drum that you are stading on and the acid that surrounds the Drum that you occasionally get thrown into. Use Z-targeting on one of the hands and shoot it with an Arrow to paralyze it. Quickly shoot the other hand before it can attack you. Then Z-target the glowing eye and shoot it when he gets near. Time your Arrow carefully though because he picks up speed as he charges you. Once he falls to the ground paralyzed slash his eye as many times as you can. If you run out of Arrows or Magic, his hands drop refills when they're paralyzed. After many slashes he will melt. Twin Rova - This boss consists of actually two Witches. You will need your Mirror Sheild for this boss. Stay on the center platform for the fight. When a Witch throws her energy (either fire or frost) use Z-tareting on the opposite Witch. Have your Mirror Sheild reflect the energy and launch it back to the other Witch. If you get hit yourself you will lose a lot of health. After a series of reflections they will join to make one Witch. Always keep Z-targeting on her. She will throw one energy at you and your Sheild will absorb it. Make sure the next energy she throws is the same one that you absorbed. She will throw a third energy and if it is the same one absorb it. You will then shoot a powerful attack at her and she will fall to the ground. Run over and slash her as many times possible. She will then get up and keep doing the same thing. When you have partial energy absortion she may throw the opposite energy than you currently have. Just simply go to the side of the platform. After a lot of slashes you will have put out their flame and melted their ice. Ganondorf - You will need the Longshot, Arrow of Light, suggestively the Biggoron's Sword and possibly Hover Boots. Quickly run into a corner and face Ganondorf once the battle has started. Pull out your sword and be ready for the baseball-like situation where you have to reflect his attack, just like with Phantom Ganon. Hit the energy ball back and forth until Ganondorf finally gets hit. Whip out your Light Arrow and quickly shoot Ganondorf. He will fall to the ground for you to use the Longshot and pull yourself over to him. Slash him as many times as possible. When he starts to get back up you can either use your Hover Boots to get back or the Longshot onto the wall. Keep repeating this process. Sometimes, before he shoots the energy ball at you, the sound of his flying will stop. That is an instant cue to start charging your Sword by pressing and holding B. Just as soon as he shoots the 5 energy balls at you release B to reflect all of them back at him. Then continue on how you usually would. After 20 slashes with the Master Sword or 10 with the Biggoron Sword you will have defeated your nemesis. GANON - Final Battle - You will need the Megaton Hammer unless you have the Biggoron Sword. The Light Arrow is optional. Here is the strategy: just keep rolling under his legs and don't stay in front of him! When the Master Sword is knocked away from you use either the Biggoron Sword or the Megaton Hammer to hit the tip of his tail. Once you have the Master Sword back you must use it! Everything else will appear as if it is doing damage but you won't be getting anywhere. You can use the Light Arrow on his face to paralyze him temporarily but it won't make much of a difference. Once he has fallen to the floor a second time you just need to strike one final blow . . . |